If you own a sprinkler system, chances are you will need to replace a sprinkler valve sometime during the life of your installation. Learning how to replace a sprinkler valve is easy with our simple steps and you will be done in no time at all. If you have any trouble with your project, please contact us and a member of our staff can help you with your question.
Tools and Parts Needed for Replacing Sprinkler Valves
Before you can even begin the repair you will need to know exactly what types of tools to have on hand. You will need to figure out the size of the valve you are replacing, and purchase all the parts and fittings which go along with it. Here are some other tools you will need to work on your repair.
- Pipe cutters
- Pliers
- PVC glue
- Teflon tape
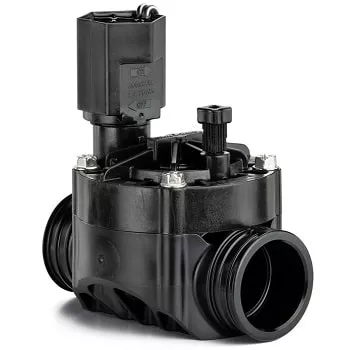
- A replacement sprinkler valve
- PVC male pipe adapters
Sprinkler Valve Repair in 5 Steps
Once you have purchased all the supplies you need you can then begin your repair. Before you begin taking apart your system you will want to make sure that you shut your water off. This will keep water from spraying all over the place while you are working on your repair. Now you can begin to fix your broken valve.
- Disconnect the Wiring - If it is an automatic sprinkler valve that you are replacing you will need to disconnect the wiring which is attached to the valve. Be certain that you watch how you disassemble the wire because you will need to put the new wires in place exactly how they were set up.
- Swap Out the Old Valve - To remove the old valve you will need to cut off the old PVC adapters directly below the hub. This will make it so your new valve will only be a tiny bit lower than the old one.
- Prepare Your New Valve for Replacement - Getting your new valve ready is simple and only takes a few steps. To prepare your new valve all you have to do is install the new PVC male adapters that you purchased onto your new valve. You can use your teflon tape on the threads. This will give it a better seal.
- Install New Valve - Now comes the easy part. Use your PVC glue to attach your valve securely in place. You can do this by placing glue on the inside of your adapters and the ends of the pipes. Once you have your glue rubbed on you can quickly attach your valve giving it the proper seal that it needs.
- Reconnect Your Wiring and Give it a Try! - Once you have attached your new valve into place you can reconnect the wiring exactly the same way it was before. Once you have all your wiring hooked up into place you can test out your sprinkler system to make sure it works properly and then you are done.
Tips from the Pros
These 5 simple steps sound easy, but there are a few things that might make things a little difficult along the way. For example, when you cut the pipe, pay attention to the position of the pipes on both sides of the valve. Oftentimes settlement of the pipes will result in pressure from the dirt forcing the pipe up or down and out of position. The only thing holding it in place being the valve. If this happens you will need to dig further back along the pipe until it become loose enough for you to manipulate it into its proper place using dirt and often times rocks to hold it there.
Another thing that is often tricky and something to avoid is getting glue inside the valve. I have seen valves glued shut before because the glue followed gravity downhill into the valve and seized it closed. Technically the valves should be level and probably were when it was originally installed, but water + dirt = settling, so things that were once level may no longer be. Also, make doubly sure the replacement coupling and pipe set up are the proper length. A set up that is too long will result in extra pressure against the threads, or in glue only situations, against the valve, and that can cause problems of their own. When dealing with plastic, pressure cracks can be common if too much force or torque is applied. A set up that is too short will not have a good bond on either end. Either the threads will not be tight enough and will leak, or the glue will not have enough surface to bond with and will “pop” when pressure is applied. This might not happen at first glance, but leaks can lead to settlement issues and ultimately a faulty foundation under your home.
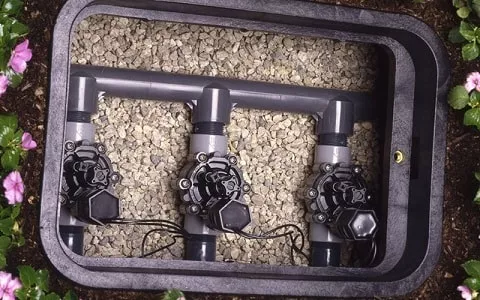
Sprinkler Manifolds
Those of us that live in places where irrigation water may not be as clean as culinary water understand how hard sand and minerals are to everything water related. For this reason I have come to appreciate sprinkler manifold systems. Bad solenoids, corroded diaphragms, cracked threads, these are just a few of the reasons I have replaced valves before, and the ones that have the manifold system have saved me a ton of time and lots of money.
The sprinkler manifold systems I am talking about eliminate the need to cut and re-glue sections of pipe to rebuild damaged manifolds or valves. They can be expanded upon, if you ever decide to add an additional line for your shrubs, trees, or garden. The process is simple. Each valve has a threaded male adapter in it, which is threaded into the both the sprinkler valve and a union. The union is glued to the pipe so you don’t need to worry about glue getting in your valve, and it threads on to your male adapter and is sealed with o-rings for a watertight connection. With a manifold system, when the valve goes bad all you need to do is disconnect the wires, unscrew the unions, remove the valve, remove the adapters from the old valve and put them in the new valve, and then put the new valve in place by tightening the unions and reconnecting the wires. That’s it. No messy glue or primer on your hands, no cutting and measuring pipe, no guesswork. Simple, quick, and easy.
Follow this Guide for Easy Sprinkler Valve Replacement
Replacing a defective sprinkler valve is a fairly easy process. When it is done by the homeowner it's fairly inexpensive and doesn't require a lot of parts. Now that you know how to replace a sprinkler valve, do the project and share pictures with us on Facebook. Remember to buy discount sprinkler valves from Weathermatic, Toro, Rain Bird, and more right here at PlumbersStock!
Related Resources:
Fixing a Broken Sprinkler
Find a Sprinkler Leak
What Is an Antisiphon Valve
Sprinkler Maintenance Checklist
When to Water Your Lawn