 If your toilet is leaking from the tank, here’s a step-by-step guide to help you diagnose and fix the issue. PlumbersStock is your online expert regarding toilets. Follow this guide and you’ll have your problem solved.
The first thing you want to do is close the supply valve!
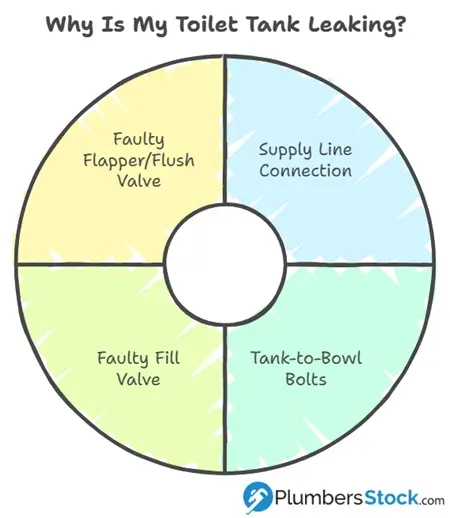
Identify the Leak Source
- Between the tank and bowl: Could be the tank-to-bowl gasket or tank bolts.
- From the water supply line: Could be the supply line connection or fill valve.
- From inside the tank: Constant dripping into the bowl suggests a flapper or flush valve issue.
Toilet Leaking from Bottom of Tank
So you have water leaking from the bottom of the tank. First, you must determine if it’s coming from where the tank connects to the bowl or where the tank connects to the supply line.
Is the Tank Leaking Where It Connects to the Supply Line?
If so, check the nut connecting the supply line to the tank. Tightening it should do the trick. If not, you may need a new supply line or fill valve, depending on which is the faulty party.
Is It Leaking Because the Tank is Cracked?
If so, you have to replace the tank (assuming this is a two-piece toilet. Tank leaks are rare with one-piece toilets.
Toilet Leaks at Tank Bolts
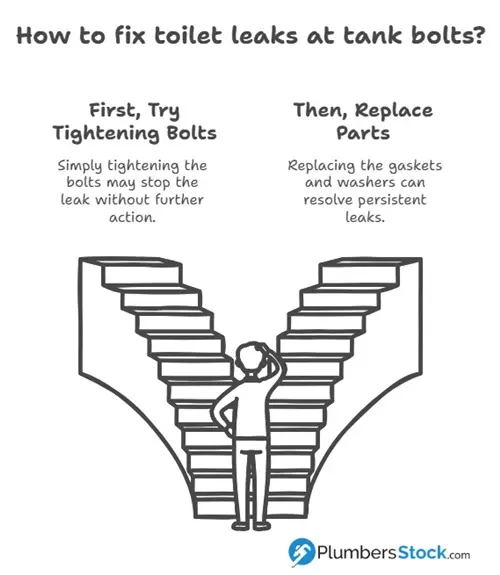 If the leak is coming from where you see the bolts securing the tank to the bowl, then
- Turn off the water supply and flush the toilet to empty the tank.
- Use a wrench to tighten the tank bolts—but don’t overtighten to avoid cracking the porcelain.
If leaking persists:
- Remove the tank and replace the rubber gasket and bolt washers.
- Reinstall the tank and tighten bolts evenly.
Toilet Fill Valve Leak
If the fill valve leak is just happening within the tank and overflowing into the bowl, then you likely need to replace it.
- Make sure the rubber washer at the base is seated correctly.
- If that doesn’t fix the problem, buy a new valve. They’re not that expensive.
Here are some signs that you have a bad fill valve:
1. Hissing or Whistling
- Cause: Water is continuously flowing through the fill valve due to a worn seal, misaligned float, or debris.
- Location: This sound usually comes from the left side of the tank.
- When: Often constant, or it may stop briefly and then resume.
2. Running Water Sound (Constant or Intermittent)
- Cause: A leaking fill valve causes the tank to slowly drain and refill repeatedly.
- When: You might hear the tank “refill” periodically, even though no one has flushed — often referred to as a “phantom flush” or “ghost flush.”
3. Dripping or Trickling
- Cause: A slow external leak from the base of the fill valve or the supply line connection.
- Location: You may hear this inside the tank or see/hear drips under the toilet.
4. Gurgling (Rare)
- Cause: Air being pulled through the valve or partially clogged internal parts — this is less common but can occur in older or malfunctioning fill valves.
A Tip from Fluidmaster:
“If the fill valve does not turn on, will not turn off, or will not refill the tank after the flush:
- Remove the top cap and check for debris. If you find debris, or flow is weak: Inspect the lower section of the fill valve for partial blockage. Partial blockage may be at the shut-off valve or in the water supply line.
- If the fill valve has been in use for some time and/or the float cup does not drop when flushing the tank, replace the seal with a genuine Fluidmaster 242 seal.”
– Fluidmaster 400A Installation & Troubleshooting Guide
Tank Won’t Stop Leaking Into the Bowl
In this case, you likely have a leaky flapper or flush valve.
- If water is leaking into the bowl:
- Replace the flapper — it’s an easy and inexpensive fix.
- If the flush valve seat is cracked, you may need to replace the entire flush valve.
Final Checks
- Turn the water supply back on and watch for leaks.
- Check all connections once the tank has refilled.
- Place paper towels around suspected areas to detect slow drips.
When to Call a Plumber
- If the tank is cracked or leaking after parts replacement.
- If bolts are rusted or porcelain cracks during repair.
Need help identifying the leak source? Feel free to upload a photo or describe the issue in detail!
Resources:
Video: Most Common Leak
About the Author
Nathan is a product expert and has worked for PlumbersStock since 2012. Like many in the company, he's a graduate of Southern Utah University. He enjoys spending time with his family, the gym, being in the mountains, reading, movies, music, watching sports, and playing CoD online with his little brother.
