 Before we tell you how to replace a toilet flange, we must be sure that you have properly identified the problem. It’s a lot of work, and you don’t want to start the project if it’s not necessary. To be safe, let’s confirm we’re dealing with a broken toilet flange. First, let’s begin with the basics.
Why Replacing a Damaged Toilet Flange Matters
- Prevents water damage from leaks at the base of your toilet
- Eliminates sewer gas odors from escaping into your bathroom
- Keeps your toilet stable, preventing rocking or shifting over time
- Protects flooring from moisture-related issues like mold or warping
Tools and Materials You’ll Need
Tools:
- Adjustable wrench
- Screwdriver (flathead and Phillips)
- Putty knife or scraper
- Tape measure
- Shop vacuum (optional)
- Hacksaw (if cutting bolts or old flange)
Materials:
- Replacement toilet flange
- Wax ring or wax-free seal kit with closet bolts
- Toilet supply line (optional replacement)
- Toilet seat (if replacing)
- Silicone caulk (optional)
Step-by-Step: How to Replace a Toilet Flange
1. Turn Off Water Supply & Drain the Toilet
Shut off the water supply at the valve behind your toilet. Flush once or twice to empty most of the water from the tank and bowl. Use a sponge or shop vacuum to remove any remaining water.
“Always shut off water at the supply line before removing your toilet. It’s one of those simple steps that saves you from major cleanup later.”
— Tom R., Licensed Master Plumber
2. Disconnect & Remove Your Toilet
Use an adjustable wrench to loosen and remove the nuts on each side of the base. Gently rock the toilet back and forth until it breaks free from its seal. Lift it straight up and set it aside on an old towel.
If you’re replacing components during reinstallation, explore our selection of high-quality toilets at PlumbersStock.
3. Remove Old Wax Ring & Inspect Existing Flange
Scrape away all remnants of the old wax ring using a putty knife. Carefully inspect the existing flange for cracks, rusting, broken bolt slots, or if it’s sitting too low below floor level.
4. Remove Damaged Flange (If Needed)
If it’s damaged:
- For PVC flanges: Unscrew them from the subflooring.
- For cast iron flanges, you may need a chisel or saw.
Clean out debris around the pipe opening using a shop vac if necessary.
“Some older homes have cast iron stacks with leaded-in flanges—that’s when I recommend calling in pros unless you’re comfortable with heavy-duty removal.”
— Ferguson Plumbing Tech Manual
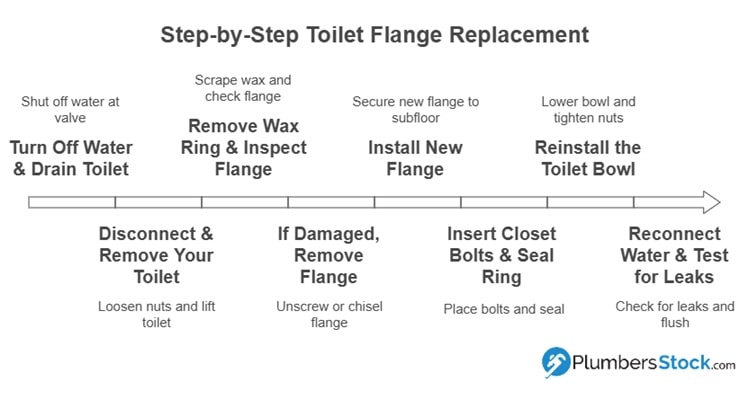
5. Install New Flange
Select a new flange that matches your waste pipe size—typically either 3-inch or 4-inch diameter.
Ensure that:
- The top edge sits flush with finished flooring.
- Bolt slots are aligned evenly left-to-right.
Secure new flange into subfloor using stainless steel screws through pre-drilled holes.
6. Insert Closet Bolts & Seal Ring
Insert new closet bolts upright into slots on both sides of the new flange.
Then place either:
 A traditional wax ring
- A modern wax-free seal
7. Reinstall the Toilet Bowl
Lower bowl straight down over bolts until seated flat against the floor surface. Tighten nuts evenly using a wrench—but don’t overtighten! Trim excess bolt length if needed using a hacksaw.
8. Reconnect Water Supply & Test for Leaks
Reconnect supply line; turn water back on slowly while checking for leaks under the tank area & around the base.
Flush several times while watching closely. Seal base edge with silicone caulk if desired—but leave rear unsealed so future leaks can be detected.
Frequently Asked Questions
 Q: Can I reuse my old wax ring?
A: No—it’s best practice to use a brand-new wax ring every time you reinstall.
Q: What if my floor is uneven?
A: Use plastic shims under bowl before tightening bolts—avoid overtightening which could crack porcelain.
Q: How do I know what size flange I need?
A: Most homes use standard 3-inch or 4-inch drain pipes—measure yours before buying!
Q: My existing floor is higher than original—what now?
A: Consider extended-height repair flanges designed specifically for raised floors.
Thanks for Stopping By
Hopefully, this guide on how to replace a toilet flange will prove helpful with your plumbing project. Please give us feedback. Thank you for visiting PlumbersStock. Please share your project with us on social media. If you want to update your toilet seat, tank, etc., we have plenty of deals.
Related Resources
- Wiki: Closet Flange
- Fixing a Toilet Tank Leak
- How to Measure a Toilet Rough-In
- How to Replace Toilet Water Supply Line
- Learn to Replace a Toilet Handle
- Toilet Seat Replacement Tutorial
About the Author
Cliff is a proud Dad and already a Grandpa, if you can believe it! He likes to lift weights, play basketball, hunt, and do just about anything outside. He has been in the construction and plumbing business off and on since 1989 and has tons of experience in many areas of home improvement.
