
If you think you need a new thermocouple, have you considered that maybe you need to clean the one you have? Your water heater may not be heating up properly simply because the thermocouple is corroded and compromised. A thermocouple is a sensor for the pilot light, which enables the water heater to regulate its temperature. Here we cover how to clean a thermocouple on a water heater. This is a job simple enough for novice DIYers to tackle.
What do you need?
- Adjustable wrench
- Emery cloth sandpaper
- Lint-free cloth
What Is a Thermocouple?
A water heater thermocouple is a safety device that detects whether the pilot light is lit in gas-powered water heaters. It’s a small metal sensor that sits near the pilot flame and generates a tiny electrical current when heated by the flame. This current signals the gas control valve to stay open, allowing gas to flow. If the pilot light goes out, the thermocouple cools, cutting off the gas supply to prevent leaks or explosions. Over time, thermocouples can wear out or become dirty, causing pilot light issues. Replacing a faulty thermocouple is often an easy, cost-effective repair.

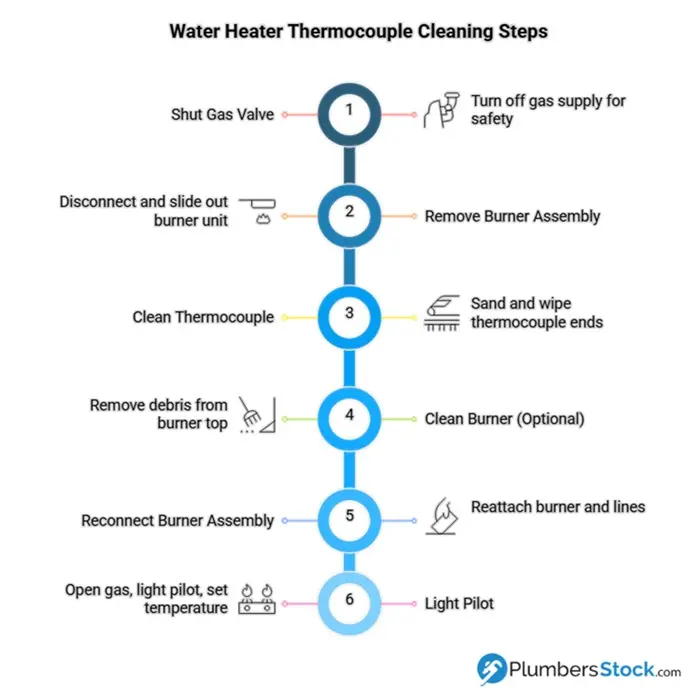
Water Heater Thermocouple Cleaning in 6 Steps
- Shut the gas inlet valve – safety first! Cut the fuel supply to the water heater. This is always the first step when working on a water heater. If it’s electric, cut the power. In this case, it’s gas, and you need to turn off the gas valve.
- Remove the burner assembly – take a picture before doing anything so you can remember how it looks when it’s correct. Using the wrench, disconnect the burner assembly from the control center. It’s connected in three places (thermocouple, main supply tube, and pilot supply tube). Once those are disconnected, you should be able to slide the entire assembly out from its compartment.
- Clean the thermocouple – using the emery cloth or sandpaper, sand the ends of the thermocouple and then give it a finishing touch with the lint-free cloth. Hopefully, you can get to the ends of the thermocouple without having to detach it from the assembly, but you may have to do that. If you do, take care to put it back together exactly as it was. Take a picture!
- (Optional) Clean burner – while you have it out, now is an excellent opportunity to scrape any debris off the top of the burner. It will burn more efficiently if you remove encumbrances.
- Replace and reconnect the burner assembly – remember that picture you took? You want everything to look the same when you’re done here. Reconnect the three lines to the control center on your water heater tank.
- Light the pilot – you need to open the gas valve, light the pilot, and turn the dial to your desired temperature (we recommend no hotter than 120-degrees F). Once that’s all done, you should be back in business.
Now What?
Give your water heater time to warm up if it’s working, then great! If it’s still not working, you may need to cough up the dough and buy a new thermocouple. You’re in luck because PlumbersStock has a great selection of water heater parts. When you get your new one, you can read our article about replacing a water heater thermocouple. You can learn more about thermocouples in general here: Thermocouples | Wikipedia
Please feel free to contact us with any questions about our products or your home improvement projects.
Other related resources:
How to Test a Water Heater Element
Change Out a Water Heater Element
How to Replace a Water Heater Thermostat
T&P Valve Keeps Opening
About the Author
Cliff is a proud Dad and already a Grandpa, if you can believe it! He likes to lift weights, play basketball, hunt, and do just about anything outside. He has been in the construction and plumbing business off and on since 1989 and has tons of experience in many areas of home improvement.
