

There are many advantages to installing a bathroom fan: (1) they provide convenient “white noise” when the bathroom is in use. (2) They improve the ventilation in the room, which helps with bad odor. (3) Most importantly, the ventilation helps combat mold and other damage caused by moisture, like peeling walls, etc. Now that you're sold on the notion, here is a guide about how to install a bathroom exhaust fan.
Bathroom Fan Installation
We recommend that you use the manufacturer’s installation instructions, but this guide can serve as a source for clarifying details of the installation that you may not understand. There are various bathroom fan options so that every install will vary to a certain degree, but they all share commonalities.
Before installing a fan, you must get the wiring right. Make sure that your switch and cable are compatible with the unit. If there is an existing light fixture, then the wiring is already in place, and this process should be a breeze. For safety: (1) turn off the power (2) lock circuit breaker box so nobody makes the mistake of flipping the switch back on (3) equip goggles and nose/mouth mask (4) consult the advice of a professional electrician who can tell you if your job requires a permit and to check for potential circuit overload.
- If you are on the top floor of the house, you may want to get into the attic to remove debris and insulation above the installation location.
- Ideally, you will be able to fasten the fan/light housing to a ceiling joist, so try to strategize for that, but if it isn’t possible, then wooden braces make for convenient workarounds.
- Draw the border of the perimeter of the bathroom fan in the desired location. Create pilot holes in each corner with a drill and use a jigsaw to cut the shape of the fan out of the ceiling.
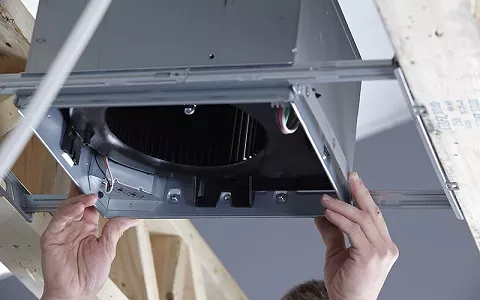
- Install the bathroom fan housing.
- If you would like to operate the fan and light separately (assuming you are installing a combination unit), then you will need 3-wire cabling. Less commonly, you may find a heating function in the unit as well, so account for that in the wiring, if applicable.
- Use connectors to wire the fan to the switch. Your wiring should come color-coordinated to keep things simple. If it’s just a fan and no light, it will be as simple as connecting black to black and white to white.
- Connect the housing to the ductwork.
- Consult your manual for instruction on how much of a buffer you need between the bathroom fan and the insulation.
- Secure the fan cover.
- Connect the wiring to the wall switch.
How to Vent a Bathroom Exhaust Fan
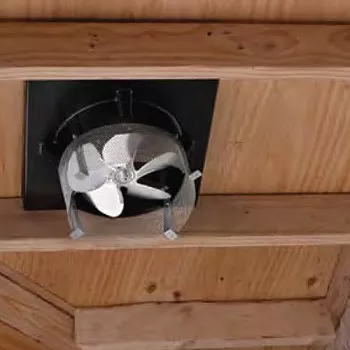
Properly venting your bathroom fan will help avoid creating moisture problems in your home. If you can avoid the use of a roof vent, then you have found the easy way out. A soffit is a termination you see coming out from underneath a roof overhang. In this case, you will need flexible ducting (probably plastic) to connect the bathroom exhaust fan to the soffit vent.
In some cases, you will find bathroom fans that feed directly through the exterior wall with a hood and dampers. Every project is slightly different, so hopefully, this gives you the framework to complete the job no matter what components you have. Now that you know how to install a bathroom exhaust fan, you are ready to take on your project.
Save on some of your favorite brands at PlumbersStock, like Broan and Panasonic.
Related resources:
Changing an HVAC Air Filter
Air Purifiers for Those with Pets