

In many parts of the country, expansion tanks are not required, but they are one of the most useful water heater accessories. Regardless, homeowners and landlords often opt to install this safety feature alongside their water heaters. This isn't the most challenging DIY job, but it is a tough one. It's easiest to install the expansion tank when you install the water heater, but that's not always an option. Before we get into detail about how to install a water heater expansion tank, let's answer a very fundamental question:
What Is a Water Heater Expansion Tank?
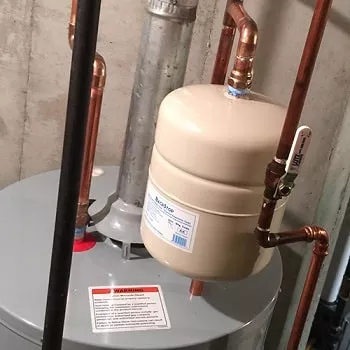
When water heaters operate, thermal expansion takes place. In the past, water heaters would drain back into the municipal water supply. Now, because of contamination concerns, cities use a check valve to prevent that backward release of water. Homeowners needing relief from pressure in their water heaters can install an expansion tank on the supply line. When the thermal expansion occurs, the expanding water flows into the expansion tank. High pressure can damage your plumbing in various ways, so expansion tanks serve an essential function. And if you need an expansion tank, try this 2-gallon Watts PLT-5.
Installing an Expansion Tank
The expansion tank can be placed on the hot or cold side. There is some debate about this, and your local code may specify one or the other, so check with your building department. You will need to have on hand a couple of pipe wrenches or open-jaw/Channellock pliers to tighten or loosen the fittings as required. You want them to be very secure. We recommend using galvanized* fittings because they are affordable, easy to install, and will work great in this capacity.
Preparation
If you already have an existing water heater and you're adding an expansion tank on top of that, then you need to drain the water heater. Before you get started, you will want to make sure there is enough space over your water heater where the expansion tank can reside. If this is new construction, then there is no need to drain anything, and you can skip to the next section:
- Turn off the water on the mainline that is supplying the water to the cold side of the heater.
- Connect a hose to the drain valve at the bottom of the heater and run the other end to the nearest drain.
- Open both the drain on the water heater and the hot side of a nearby faucet to release the pressure in the water heater tank. Don’t open the valve too much or too fast; otherwise, your hose will slide away from your drain.
- After a few minutes of draining, slightly open the T&P valve (carefully) to test for pressure. If there is none, proceed to step five. If there is still pressure, wait a few more minutes and repeat step 4.
- Once the pressure is removed from the water heater, turn off the drain valve and shut off the faucet.
Water Heater Expansion Tank Installation in 7 Steps:

- Remove the copper flex line from the nipple at the top of the water heater on the cold/inlet side. You can feel both the cold and hot with your hand; the warm one is the outlet.
- Install a tee where the flex line was connected. Don’t forget to use the plumber's tape and/or pipe joint compound (liquid Teflon) on the water heater nipple you are connecting. This will better ensure the integrity of the connection and prevent leaks. Tighten the tee so that one outlet is pointing up and the other is facing the direction that you want the tank on. You can usually move it a little once the expansion tank is connected but never turn it back (counter-clockwise). Otherwise, you are setting yourself up for a loose connection, which means a greater potential for leaks.
- Put plumber's tape on both ends of the long nipple (approximately 12").
- Tighten an elbow onto one side of the nipple, and thread the other end of the nipple into the side of the tee. Tighten both the nipple and elbow by hand and then use the pipe wrench/pliers to finish securing the connections. When they are completely tightened, you will want the elbow facing up.
- Put plumber's tape or pipe joint compound around the threads of a short nipple (approximately 2”) for the top of the tee. This will connect to the water heater flex line you removed earlier in step #1. Tighten the nipple by hand and then use the pipe wrench/pliers to finish securing the connection.
- Reconnect the water supply line to the short nipple and tighten with the pipe wrench/pliers. There is a good chance you're working with tight spaces, and if you need to, you can install a longer flex line and loop it around itself. You can also redirect it away from the expansion tank (being careful not to kink it) without compromising the installation.
- Put the plumber's tape or pipe joint compound around the threads of the expansion tank, then screw the expansion tank into the elbow that you installed during step #4. The direction the tank ultimately faces is unimportant; you want it to ensure that the connection is tight.
*Anytime galvanized and copper or galvanized and brass meets, the use of dielectric unions/fittings is required. If there is limited space, stainless steel fittings are recommended rather than galvanized because stainless steel and copper/brass do not have the same issues.
The Plumbing and Water Heater Experts
Now that you know how to install a water heater expansion tank be sure to save on all your water heater parts here at PlumbersStock. We have (Bradford White and other great brands. If you have any questions about your project or water heaters in general, please contact us.
Related resources:
How to Install a Gas Water Heater
How to Install an Electric Water Heater
How to Solder Water Heater Pipes
How to Wire a Hot Water Heater