

There are few things more annoying than a leaky bathroom faucet. It can substantially increase your water bill, result in water damage, not to mention the obnoxious dripping sound. You need to first determine if the lavatory faucet must be repaired or replaced. If you don't know how to replace a bathroom faucet, follow this guide. It's a fairly easy project, as far as DIY home improvement jobs go, and can get all the info, parts, and tools you need right here at PlumbersStock.
First, you must find a compatible replacement faucet. Make sure the configuration matches your installation. When picking out a faucet, you will need to decide on the color and finish, what type and how many faucet handles, as well as how the unit will mount to your wall or sink. Let your old faucet help guide the style choice to better ensure that the new one matches your shower faucet.
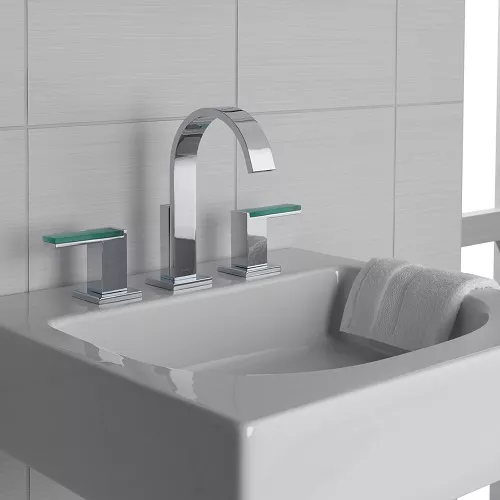
Replacing a Bathroom Faucet
This step is pretty straightforward. Before unscrewing anything, you will need to turn off the hot and cold water valves to keep from getting water everywhere. Once you have completely cut off your faucet supply lines, you can then begin disassembling your faucet. Remove your faucet from the supply lines, unscrew the metal rim around the drain and then clean all the holes with rubbing alcohol. Once you have all your tools and parts in order, you are ready for installation. We recommend reading through all the instructions before beginning the install.
Installing Your New Lavatory Faucet

- The spout – Depending on the type of faucet that you’re installing, it is smart to begin with the spout first. A single handle lavatory faucet differs in both design and installation from a two-handle faucet. The single handle faucet will mount in a single-hole sink with the water control valve included in the full installation. A two-handle design will have a separate valve in each handle. The spout will sit flush with the top of the sink, and once placed the “secure ring” will need to be screwed on and tighten from beneath the deck (sink). Don’t forget to screw on the three-way spout tee if installing a two handle lavatory faucet. NOTE: A parts diagram should be included in the manual for reference purposes.
- Installing hot and cold valves - If you are installing a faucet that has separate handles (two-handle design) for hot and cold, you will need to install a valve for each. Place the new valve (contained within the handle) in the location designed for it and then go underneath the sink and tighten it into place. Repeat the same step for the other side.
- Attach water lines to hot and cold valves - Once you get your new hot and cold valves installed into place you will then need to attach the water lines to the appropriate spot. Make sure you are connecting the right lines where they are supposed to go. You may want to take pictures of the installation when disassembling your old faucet so you know how to put it back correctly.
Once everything is back in place your faucet should be working flawlessly. Remember that almost every faucet comes with an instruction manual to aid you. Not every faucet is installed exactly the same, and depending on the type of faucet you are working with you may need to tweak these steps a little bit to suit your needs.
Save on Bathroom Updates
If you are updating the entire bathroom, you will want to replace everything with matching towel bars, light fixtures, and more. At PlumbersStock, we have a huge selection of bathroom accessories.
Related Resources:
Installing a Self-Rimming Sink
How to Install a P Trap
Installing a Single Hole Kitchen Faucet
How to Install an Undermount Sink in Granite